Hey there! I get commissions for purchases made through links in this post. As an Amazon Associate I earn from qualifying purchases.
If you’ve chosen to make illustrated books or children’s picture books as your creative side-hustle then self-publishing them using Amazon’s Kindle Direct Publishing platform (KDP) is a great way to earn money. Illustrated books are commonly aimed at children which require less time invested into writing. Let’s run through how to do it.
To create and self-publish illustrated books on KDP you need to:
Plan: research, select a subject, draft your plot
Write: tell a great story and select a title
Illustrate: storyboard, draft and final artwork
Create Kindle and print-on-demand files using KDP tools
This post is aimed at digital creatives looking to use their skills on a side-hustle so we’ll be focusing on software tools to create you books rather than hand-illustrations. Nevertheless, many of the steps covered here will also be appropriate for those choosing to hand-illustrate their books.
What is KDP?
Kindle Direct Publishing (KDP) is Amazon’s self-publishing platform. It allows you to sell both ebooks and printed versions of your books.
Ebooks are published as Kindle versions which can only be read on Kindle devices and supported apps on iOS, Android and Windows.
Printed books are listed on the Amazon store and printed via their print-on-demand service. Historically these have been in paperback only but Amazon are now offering hardcover options as well (currently in Beta at time of writing).
Publishers will need to sign up to KDP using with their personal Amazon account. Unlike with Amazon Associates, only one account is required in your home country to sell your books worldwide.
Don’t worry, your personal details won’t be visible to customers as you can also select a pen name when you come to publish each of your books. When setting up your account, make sure to use you actual details since these will be required for payment purposes.
If you’re serious about publishing books as a side-hustle then you need to treat it like a proper business. That means researching what customers want and the existing competition. From a business perspective, it only makes sense to publish something that will actually sell.
Therefore market research is vital to avoid you wasting your time. Identifying a subject first, still gives you plenty of freedom to write an engaging story.
If you’re just doing this for fun and dead-set on an idea that you want to publish regardless of customer demand then, there is nothing stopping you doing that. However, make sure you understand that this may not sell many copies.
…market research is vital to avoid you wasting your time.
With traditional publishing deals there is a large marketing machine to push your book out to the masses. With self-publishing you have to either take care of marketing yourself or rely on the marketplace search traffic alone.
To gain as many sales from Amazon searches as possible means that you have to play the game. Show up in search results, attract a click to your listing and then convert them to buying your book.
Generate Magical Ideas
Start by brainstorming a number of plot ideas, characters, places, subject areas and niches that you are interested in, have been inspired by or where you have already noticed a gap in the market.
For inspiration consider putting a spin on traditional tales, thinking about your childhood or considering different passions and fears. It is also a good idea to think about films and stories that you love or real-life events that stand out from the crowd.
If you’re making a children’s picture book then this could be the types of story or character such as fairy tales or knights and dragons or a particular plot device.
It is a good idea to have a number of options as you will now analyze the competition for each of them until you find something that has little or low quality competition.
Analyze the Market
Go to the Amazon store and search for the genre directly in the search box. For any relevant results open them up in a new browser tab for more investigation shortly.
Another method is to browse through the categories and sub categories until Amazon presents a list of books. The sub categories can be very specific such as Children’s Books > Animals and Pets Books > Baby Animals. Once again, open up a new browser tab for any relevant books listed.
Make a note of the number of relevant results so you can compare each of your different subject areas later.
From your observations you should be able to identify if there are any gaps in the market that do not have many search results, or perhaps none at all.
An important check to now go through is to understand if potential customers are actually searching for the type of book that you think you’ve identified. If nobody is searching for it then they will not find your book and you won’t sell any copies.
A good technique is to start typing into the search box in amazon and if you see it offer some relevant autocomplete suggestions then that means people are searching for that already which is great!
Benchmark The Competition
Image credit: dusanpetkovic1 / stock.adobe.com
With the books that you’ve highlighted as relevant competition it’s important that you now review their features, quality and marketplace listings to ensure that your book is created and marketed on the same level and preferably better.
Some of this can be done by looking at the listing on Amazon, including the ‘look inside’ feature if available. You may find that you need to invest in purchasing some of these books. The cheapest way to do this is by buying the Kindle version unless you already have Kindle Unlimited which may allow you to download the book for free since it may be covered in the monthly subscription.
Start by assessing the level of quality of the writing, illustrations and layout of the book. Does your competition frequently have double page spreads of glorious images for example? If so, then this is something you may also need to include. If they don’t then your book will stand out from the crowd if you include these.
Review book length as well. Whilst most picture books are 32 pages, if you competition is much shorter or longer this can give you a guide on where yours should sit.
Search the titles of the top selling competitors and make note of common phases, words and length. Titles are one of the most important factors when attracting customers – even more important than the actual quality of your book. Obviously, if your book is good quality it will attract good reviews but without a good title, few people will find or buy your book.
Cover art is another of the most important factors. Once again, search the top selling competitors and note down what types of image they feature on their covers. Do the top selling children’s books about knights and dragons feature large images of fire-breathing dragons or are they knights in suits of armor?
Search the text inside the Amazon listing itself. Write down important keywords included and the types of things included in the descriptions. Keywords in listings will help Amazon know to show your book in search results for relevant queries.
As you go through your competition also note down the sale price of the top sellers since you’ll need to price your book competitively once you’re at that stage of your journey.
Choose Your Final Theme
With your idea generation and market research complete you should now be in a position to select your book theme. This decision should be a combination of selecting a great story and something that other sellers are not offering to customers.
Choose a theme that excites you and is unique in the market. Check that the topic has verified customer searches yet also has low volume or low quality competition. Your aim here is either to fill a search that nobody else has or to create a higher quality or book than is already published.
You may also find that the results for a particular customer search do not meet the search intent meaning that a more specialized book will meet their needs.
The perfect balance is to find a search that has some results which demonstrate that there is a viable market but where the competition is low or of a quality that you can surpass.
Plan Your Illustrated Children’s Story
Even though you might be eager to get writing, planning your story upfront will help you stay on track and create something that is more enjoyable to the reader. It will also help you to speed up your workflow.
Outline Characters and Places
Start by creating profiles of your main characters. What is their back-story and motivation; how do they speak and what quirks do they have?
Do a similar exercise for places. Who lives there, what goes on there? Are they key events that have or will occur there?
By creating these profiles you can reference them throughout your writing to gain inspiration and maintain consistency of actions, conversations and the plot itself.
Draft The Plot
It is important to write a timeline or a list of bullet points outlining the main events of the story before you begin writing. Otherwise you risk your story rambling on and lacking a structure. This is particularly important in an illustrated children’s book where the word count is low and every word matters.
By considering your story at a high level you can make sure that it has the traditional structure of a beginning, middle and end. This structure is there to provide a story that takes the reader on a journey and reaches a satisfying conclusion.
Make sure that you include plot twists, a journey for your character and any life-lessons or values that you want your book to promote.
Now is the time to select you page size. Look at a variety of children’s books and select a size that you think will work well for your book. You can always go back and change this if you find during your storyboarding that you need more or less space. KDP have a list of available sizes known as “trim sizes” in their documentation here.
How to Write a Children’s Story Book
Image credit: Rawpixel.com / stock.adobe.com
Now it’s time to do what you’ve no doubt been eager to get your teeth stuck into, the actual writing.
Flesh out your draft plot in your chosen writing style, being sure to reference your character character profiles as you go. Decide if you are going to opt for humor (including the ever popular fart joke), rhymes, etc.
Ensure that you grab the child’s attention on the first page of the book and make every page a cliff-hanger to get them through to the end. Keeping the attention of a child (and their parent for that matter) is a tough task. That includes when it comes to word count. The younger your target age group, the lower the total word count should be.
Picture books generally include 500-800 words for 4-6 year olds with an increase for older children and a decrease for younger ones. Since word count is so limited you will need to keep written detail to a minimum and maximize the use of your illustrations.
My advice is not to edit too much as you go and make it your main objective to get to the end and finish your first draft. Editing and refining in loops is much more effective and easier.
Storyboard Your Book
Using your initial draft, start planning the layout and illustrations you’ll need that work with the text. As you do this, the pacing, text on each page and the illustrations you need will all evolve to work as one.
Traditional picture books have 32 pages (not including the front and rear covers) but self-publishing gives you freedom away from this if you wish. Nevertheless, Amazon KDP requires that the number of pages must be divisible by 4 with a minimum of 24 pages.
To storyboard your book, draw out a rectangle for each page and write inside it’s purpose or plot element and sketch a small illustration.
…Amazon KDP requires that the number of pages must be divisible by 4 with a minimum of 24 pages.
As you create your storyboard you can write out your text for each page from your main manuscript. Think about how you group your sentences together to form the paragraphs on each of the pages and how they work with the illustrations you are sketching.
You will need to do several loops, adjusting the text on each page, illustrations you want, the pacing of the book and the layout of the pages.
At the end of your storyboarding exercise you should know the rough layout of each page, the text that will be on them and what illustrations you will be creating.
You can do your storyboarding exercise either electronically or on a physical piece of paper – it doesn’t really matter. Draw a rectangle that represents each page of the book. The important thing is that you can see all of them at the same time. This is not the same as making a prototype book (folding up pages) – this can be done later if you wish.
Your book will need to include additional pages other than just your story. These are broken down into three sections:
Front matter – Title page, copyright information, dedication
Body Matter – Your story
End matter – Anything after your story (optional)
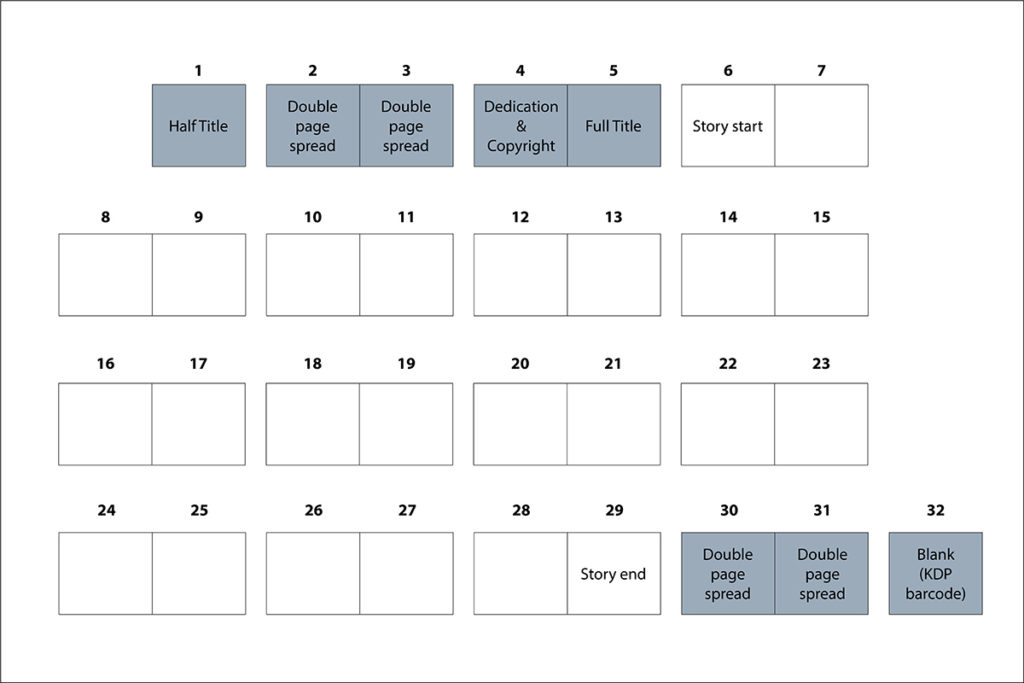
Storyboard layout for paperback KDP self-published books. Image credit: solocreativity.com
Let’s break that down into a little more detail:
Front Matter
In the diagram above I have included common front matter. As you can see it adds up to 5 pages:
Half title – Literally just the title of your book with no author or any other information. This is the first page of the book interior. Some authors prefer to use just a small image instead but a half title is the most common.
Double page spread – This is a great place to include supporting artwork such as maps, landscapes, patterns, etc.
Dedication and copyright – Typical layouts include a dedication at the top, a small image in the center and copyright information at the bottom.
Full title – Large title at the top, image in the center and author / illustrator info at the bottom.
Body Matter
This is the story portion of your book interior. If your whole book is 32 pages then your story itself will only be 24 pages by the time you have included front and end matter.
Consider whether you want to have text on one side of the book and images on the opposite side, double page spread images, text and images on each page or a combination of all of the above to keep it interesting. You will likely find that each page of your story will benefit from a different layout to work with how much detail your images convey vs the text.
End Matter
Authors typically include a double page spread similar to that used in the front matter. You can also consider including information on other books in a series that you may have already written.
The last page in your book must be left blank. Print-on-demand services such as KDP will add a page to the end of your book for the printing information including a barcode. Therefore subtract one page from your book to allow for this.
If you don’t then they will add the extra page and then additional pages until the total is divisible by 4 again. That means you will then have 3 blank pages at the end of your story followed by the KDP barcode – not what you want!
Choose A Title
Cynical as it sounds, the most important aspect of your book is actually the title. This is because it will get potential customers to find your book and convert to a sale if it is targeted correctly to them.
Reference your competitor research and take a look at the kind of words that are being used on the top sellers of your direct competition. Try to include some of these or synonyms whilst still creating a clever and unique title. It sounds difficult to do and it is.
Keep in mind that alliteration or rhymes are particularly good for children’s books.
It is very important to include your main keywords (what people will search for to find your book) in the title. This helps make sure that Amazon will show it in a potential customer’s search result. You could achieve this by including a subtitle.
How to Illustrate a Children’s Picture Book
Image credit: shyshka / stock.adobe.com
From your storyboard you should have planned out what illustrations you want for each page of your book. You will also have the text that is going to go on each page.
With a children’s illustrated book it is important to keep the wordcount low on each page. That means the illustrations play a particularly important role in telling the story as they will show a lot of the detail that cannot be included in the text.
The illustrations are the most important feature to keep the child interested so each one should be eye-catching, colorful and full of interesting details that can be explored with every read-through.
The main steps to create illustrations for children’s books are:
Create draft linework either sketching by hand or using a drawing tablet
Add rough color in Adobe Photoshop or similar software
Create your final line art using a vector software such as Adobe Illustrator
Add final color, shadows and detail
When illustrating your book it is good practice to use a lot of reference images. This can be to help with sketching forms, choosing the right colors or for illustration style inspiration. Now, let’s run through the main steps in more detail:
Draft linework – a lot of illustrators prefer to sketch using pencil and paper and then scan in their artwork. Alternatively, you can use your drawing tablet to generate linework directly into your favorite software.
Draft color – take your sketches into Adobe Photoshop and add rough color. This will allow you to see what your artwork will look like as a whole before you invest many hours into creating your final artwork. It is much easier at this stage to make changes to composition than later on.
Final linework – depending on your illustration style you can either use Adobe Illustrator to generate vector linework for a clean and crisp feel or sketch by hand using ink and scan it in
Final color – use Photoshop to add the final color, light, shadows and details
When saving your images make sure to size them to fit your pages when at 100% scale. They must meet a minimum of 300dpi and have all layers flattened to remove transparencies which will otherwise cause printing problems and be rejected by KDP.
How to Create the Internal Layout of an Illustrated Children’s Book for KDP
You will need to create your book interior and cover as two separate files. I’ll go through the steps for the cover later but let’s first run through how to make your inside pages.
Before starting to create the pages of your book there is some terminology that you will need to know:
Trim size – the size that the physical pages will be cut down to after printing.
Bleed – the additional border added around the trim size. Images will be printed to up to the bleed, resulting in a clean edge once trimmed down.
Margins – the internal border to contain text at a satisfactory distance away from the edge of the page.
If you’ve been following through this blog post then you will already have selected your book’s trim size from Amazon’s documentation here.
What Software to Use for Creating Inside Pages of Illustrated KDP Books?
I recommend using Adobe InDesign to create the inside of your book so that’s what I’ll be using for this section. Head over to Adobe to get hold of InDesign if you don’t already have a Creative Cloud subscription here (paid link).
Another popular alternative is Canva which has both free and paid versions. The negative with using Canva though is that it is not easy to make changes to pages so I do not recommend it in this case.
How to Create Inside Pages for Illustrated KDP Books
The main steps to create a layout for the inside of a self-published KDP book are:
Set up your book file
Assign a purpose to each page
Insert your illustrations
Input the text on each page
Tweak page layouts
Export your file
Let’s go through the steps in more detail…
Set up Your Book File Using Adobe InDesign
Create a new file in Adobe InDesign. Use a custom page size that corresponds to the trim size you have selected already from the KDP Trim Size List.
Choose the number of pages that correspond to your story plus the front and end matter remembering to include the blank page at the end for the KDP barcode. Make sure “Facing Pages” is selected as well.
Add a bleed of 0.125″ (3.2mm) to all sides (except for the inside due to the spine) so that your pictures can be printed to the edge of the page and then trimmed down for a crisp edge. See more info in the KDP documentation.
The minimum inside margin required by KDP depend on the page count of your book (see documentation here). For most picture books this will be 0.375″ (9.6mm). KDP also has minimums for the other margins as well shown in the documentation but these are independent of page count. 20mm is a reasonable size for a picture book but you can choose what suites you as long as you observe the minimums stated.
Assign a Purpose to Each Page
Using your storyboard as a reference, insert some placeholder text on each page to show its purpose -eg: Half Title, Double Page Spread, etc. This will help avoid confusion as you work through the layout of each page. Just make sure to delete it later.
Insert Your Illustrations
Insert your illustrations into InDesign as links to ensure that images will auto update if the source file is changed.
If any of your images need to extend to the edge of the page then make them larger than the trim size and go to the edge of the bleed. This means that when the pages are cut to the final size they will have a nice clean edge.
For double page spreads it is important that the two halves of the illustration line up correctly to avoid a an offset in the center of your book. InDesign will take care of this automatically unlike Canva which requires a workaround.
If any of your images need to extend to the edge of the page then make them larger than the trim size and go to the edge of the bleed.
Input and Format Page Text
Insert the text on each page as per your draft and storyboard.
Select a font that conveys the feeling of your book. Importantly, make sure that you use a font that you are legally allowed to use. Check out a great post on font copyright law on Kindlepreneur for some further guidance on the topic.
A great source of fonts is Adobe Fonts which are included as part of your Creative Cloud subscription. Make sure to check that out if you haven’t already.
With regards to text size, books aimed at younger age groups should use a larger size and short lines. For a picture book experiment with sizes 16pt-24pt until you are happy that each paragraph is easy to read for your target age group.
Adjust the formatting and position of the text around the illustrations until the layout of each page looks right. You can choose to simply have a discrete paragraph on each page or stagger each line around the page and play with sizes of words to generate more visual appeal.
Adjust Page Layouts
It can be helpful at this stage to print a prototype book yourself and check how each page looks and the story flows.
Make any final adjustments as you see fit and don’t be afraid to let others read it and give their feedback.
Export Your File
Since your illustrated book will need a to be a ‘fixed layout’ and likely including pages with bleed to allow picture to go right to the edge, you will be required by KDP to save your interior file as a PDF. The recommendation is to use PDF/X-1a specifically.
There is a file size limit of 650MB and all images must meet minimum of 300DPI. In addition, pages must be exported as single pages and not as spreads.
After your title, the cover of your book is the next most important element to generate organic sales of your book. Once again, reference your competitor research of what elements and styles the top-seller competition is using.
For example, if you see bold colors with a large image of the main character then you should strongly consider create a cover that features a similar approach. Keep in mind that you still need to create something unique to stand out but these covers are doing a good job which you shouldn’t ignore.
Amazon offers the KDP Cover Creator which will allow you to import images, add text and the barcode area using a number of templates. This is aimed at simple covers and hence I suggest creating your own outside of the tool in a program such as Adobe InDesign to meet the KDP guidelines.
…I suggest creating your own cover in a program such as Adobe InDesign…
To create your cover outside of the tool you will need to use the KDP Cover Calculator. Fill in your books information which includes binding, print quality, paper type and a confusing option called ‘Page-turn direction’.
The Page-Turn Direction in the KDP Cover Calculator refers to the direction that the text is read and NOT the direction that the book pages are turned. This commonly causes confusion for new authors. For traditional Western books this will be Left to Right.
The Cover Calculator will give you all the dimensions you need and also generate a template that you can download. Import this template into your layout software and follow the instructions included in the readme file provided with it.
Make sure that the images used are flattened with a minimum of 300DPI, as with the interior pages.
Once finished, simply export your cover as a quality PDF in CMYK.
Amazon will automatically place a barcode on the back cover for the ISBN but the template shows where this will be so you can avoid putting anything important there by mistake.
How to Create a KDP File for Printing
Image credit: industrieblick / stock.adobe.com
Now that you have your PDF file for the interior pages and cover, you can upload these to the KDP platform.
Once logged in uploading is done via your Bookshelf. Upload your interior pages by selecting ‘Edit Paperback Content’ in the case of your illustrated book. If you have produced a book with over 100 pages then you will also be eligible to choose a Hardcover but that’s outside of the scope of this particular post and likely most self-published illustrated books.
To upload your cover, select you book from the Bookshelf, select Edit and then Upload your cover file.
Once uploaded you can use the ‘Book Previewer’ to check for any issues. Make sure you do this thoroughly. Whilst you can make some changes once published, there are certain things that cannot be changed without creating a new listing.
To be extra sure that your book is formatted as you wish, KDP allows you to order proof copies of your book. These can be ordered before you submit your book for quality review. See the KDP documentation on proof copies for more information.
How to Convert a KDP Paperback Book into a Kindle Ebook
Since you’ve gone to all the trouble of formatting the paperback version of your book, you’ll be glad to know that it’s relatively easy to convert it into a Kindle ebook.
Amazon offer the Kindle Kids Book Creator which can be used for this exact purpose with some additional reformatting of your pages as well. The tool is available for download on MacOS and Windows.
The main steps to convert your paperback book into a Kindle version using Kindle Kids Book Creator are:
Create a new file
Import your cover
Import the PDF of your internal pages
Join pagesfor spreads
Add panels
Add text popups
Add hyperlinks
Build and preview
Export your file
Test your ebook
Some of those steps require a little more detail so, let’s delve a bit deeper.
Cover Images for Kindle Ebooks
When importing your cover you won’t be able to use the same file as your paperback. The reason is that for print, your cover file will have included the front and rear covers as one wrap-around image.
For Kindle, your front cover needs to be a separate page and no rear cover will be required.
In addition, you should remove the bleed from the file since this is not required.
With the images, convert them to RGB instead of CMYK and lower the resolution. A balance should be struck between quality and file size so a good guide is to use 96dpi.
Importing Internal Pages
This is where the Kindle Kids Book Creator tool should be really helpful. It allows you to import a multi-page PDF so you would logically think to use the file from paperback version of your book. This would be a mistake for a number of reasons.
Firstly, there are some potential problems with any images or text with very thin lines. You may find that you need to thicken up fine lines or bold text to avoid the Kindle uploader simply removing them.
This can be frustrating of course, so have patience.
As with the cover you should also remove bleed and covert images to RGB at 96dpi.
Since Amazon will charge ’delivery costs’ for facilitating customers downloading your book, the larger the file size, the higher the charge. Keeping your images at 300dpi as in your paperback will erode your profits significantly.
Join Pages Together
The Kindle Kids Book Creator allows you to move pages around or add and delete them as required.
Importantly, for an illustrated book you’ll also need to set which pages are to be viewed individually and which are double page spreads.
When assigning a double page spread, select both pages in the navigation area, go to ’Page Settings’ then select ’Double Page Spread’. In the Design Tab set the orientation to Landscape. These pages will then be shown side by side as intended.
Add Panels
Panels are enhancements to Kindle ebooks that easily allow the reader to tap on an area of your page causing it to zoom in for easier viewing.
You define these for each page as you see fit and they could focus on parts of your illustrations or text.
To add panels, edit a page move to the design tab and select ’detect panels’ by right-clicking the page design. You can now define the tap region and the zoom area for each panel.
Add Text Popups
Similar to panels, text popups allow you to add text that will be zoomed into when tapped by the reader.
Add Hyperlinks
You will probably only use these at the end of your book to point readers at your website for example. It’s a good idea and makes it more likely readers will head over there if it’s easy.
Hyperlinks can be added by going to the HTML View tab when editing a page’s settings and editing the HTML directly.
Build, Preview and Export
From the Build menu select ’Build and Preview’. During the process you may see errors occur which you will need to fix with the help of the Kindle documentation.
Once complete, check the preview for errors to the formatting and proceed to ‘Export as KF8’ once you are happy.
Test Your Ebook
It’s a good idea to test your ebook on a Kindle device if you have access to one.
This is done by simply plugging the device into your computer and dragging the KF8 file onto it. Alternatively, open the file up on a kindle viewing app on your device of choice..
Creating the listing or book details for your book is very important as it ensures potential customers will find it from their search results.
You must take care when entering your book details as some details cannot be changed at a later date. For information see the KDP documentation on Entering Book Details.
Begin by adding a new book to your KDP Bookshelf.
The main elements are as follows:
Book Title
Make sure that you enter your title to exactly match the title on the cover of your book. If you are making both a paperback and ebook version then they will be linked together if they have exactly the same title.
Author
You can use a pen name here if you wish. Just make sure that you enter this accurately since this cannot be changed later. All your books will also turn up if a potential customer searches for your other work by clicking on your name in Amazon. If you aren’t consistent across your books then you might miss out on sales.
Book Description
This is your sales pitch to potential customers that are on the edge of purchasing your book. Take a look at the descriptions of your top-selling competitors and learn from what they are doing. Amazon suggests that you keep your description ‘Simple’, ‘Compelling’ and ‘Professional’.
Include any search terms organically in your description that your book is based upon such as subjects and themes of your book. If you are promoting a children’s book that focuses on a particular value or life lesson then mention this. Include the keywords that you will also assign to your listing in the next step as well.
Keep in mind that you are trying to appeal both to the child that will read your book but also the parent or relative that is going to buy the book for them. Your book must be aligned with their values and the description is your chance to convince them of this.
Keywords
Keywords are an extremely important part of your book listing as they significantly influence its visibility in search results.
Amazon allow you up to 7 keywords which can be multiple words up to the character limit shown.
You can use keywords to describe elements about your book such as info about characters, themes, time periods and locations.
Check the autocomplete feature in the Amazon search box to check if your keywords are things that customers are searching for. If they show up as you are typing then you’re onto a winner! This ensures that there will actually be somebody trying to find your book.
Selecting the right categories ensures that your book turns up in the right searches. This in turn means that a higher percentage of potential customers will choose to buy your book.
Amazon allows you to choose two categories that are as specific as you can get since your book will also show up for more general searches higher up in the hierarchy as well. For more information, check out the KDP documentation on Browse Categories here.
Look Inside the Book Feature
If you’ve ever ordered a book on Amazon you’re probably already familiar with the ‘Look Inside’ feature. This will be enabled for your book by default and can take up to 10 days to show on your listing.
The beginning of the book will be shown so you don’t have the ability to select particular pages. you can however decide how much of the book to show. For ebooks this is from 5% to 45% and printed books from 10% to 80%.
Using the Look Inside feature can convert to more sales and help minimize returns since customers can see what they’re actually buying.
There are a number of print options that you’ll need to select although, only the ink and paper type contribute to the cost of printing. Amazon will deduct this from the sale price along with their fees. For more information, including a calculator see the KDP documentation on paperback printing costs here. The options are as follows:
Ink and paper type – for an illustrated children’s book I suggest premium ink on white paper
Trim size – you will already have selected this when you made your book files
Cover finish – a choice of glossy or matte is available but glossy is best of children’s books
Pricing
When deciding what price your book should sell for, you will need to consider the minimum list price, royalty rate and printing costs (not for ebooks obviously).
Royalty rates differ between ebooks and printed books. Ebooks are set to 70% for countries that appear on Amazon’s eligibility list, otherwise it is 35%.
For printed books it will be the amount left after Amazon’s 40% fee and the print cost are subtracted from the sale price. You can get an estimate of the royalty you will receive by using the KDP Pricing and Royalty Calculator here.
The ISBN (International Standard Book Number) is the barcode on the rear of a book. Amazon will insert the barcode itself for you but you should have factored in a space for it on your rear cover already.
To obtain an ISBN you have two options:
Obtain a free ISBN through Amazon
Purchase one yourself and enter the number in your book details
If you opt for the free ISBN from KDP then you will only be able to use it on Amazon. If you want to also offer your book on other platforms then you should purchase one yourself.
Unique ISBNs must be used for paperback, hardcover and ebook versions.
KDP allows you to order proof copies of your book before submitting it for approval.
This is a good way to spot any mistakes that you might miss on a computer screen or if you’re unsure about any print-related topics.
The copies will be watermarked and have no ISBN to stop them being sold.
Author copies are normal copies of the book that you can order after your book is approved.
Both Proof and Author copies are sold to you for the cost of printing only.
Kindle Select
Kindle Select is a 90 day program that authors can enroll their ebook into (multiple times if you wish). Your book will become part of the Kindle Unlimited subscription for readers and earn you royalties based on page reads. Your book will benefit from more promotion but in exchange it will be exclusive to Kindle for the 90 period.
To enroll your ebook in the Kindle Select program, select the option from the marketing page while editing your book details.
Approval Process
Once you’ve entered your book details and uploaded all necessary files you can submit your book for review by the KDP team.
They will check it meets their content guidelines which can take up to 72hrs. Once approved your listing will be live on the Amazon and Kindle stores. Congratulations!
Marketing a Book for KDP
Now that your listing is appearing on the Amazon and Kindle stores, you can help give your book that extra bump with some promotion.
Whilst selecting the right keywords, title, cover and other book details will harness the power of the Amazon search engine, additional marketing can really help get your book launch off to a great start.
One of the most effective ways is to run paid adverts. This can either be on Amazon itself or on other platforms such as Facebook.
If you already have a social media following or a website then promoting your product on there will help your book gain traction. You can also sign up for the Amazon Associates program and earn a commission if somebody clicks your link and buys your book.
There are a number of other promotional tools at your disposal such as limited-time offers and pre-orders. Take a look at the KDP documentation on promotion for more information.
Conclusion
Making an illustrated book for children to self-publish on KDP is not an easy task but on the flip side it’s certainly not out of the reach of most digital creatives.
If you have talent as an illustrator then self-publishing illustrated books can be a very profitable side-hustle and certainly worth a try if you also have the patience to jump through all the other hoops necessary to get you product to the market.
Adobe, Adobe Fonts, Creative Cloud, Illustrator, InDesign, Photoshop, are either registered trademarks or trademarks of Adobe in the United States and/or other countries.